This is a fairly simple solution done entirely in GUI, but something I had great difficulty finding the answer to from anywhere else.
If you use another DNS and/or reverse proxy service such as CloudFlare, the DirectAdmin’s auto SSL feature doesn’t work anymore since both ZeroSSL and Let’s Encrypt provided in DirectAdmin is no longer capable of verifying your domain as DNS verification fails.
So your other services such as mail server, etc. will now fail to validate SSL while CloudFlare serves your website since CloudFlare doesn’t support your other services.
To solve this, DirectAdmin already has a feature to update DNS elsewhere during SSL verification for certain services that provide API access. This tutorial will use CloudFlare as an example as that’s most likely the most common usage as well as mine. If you use another service that’s supported in DirectAdmin, steps might look a bit different, but the process will be similar.
Part 1: Setup API keys and tokens on CloudFlare
Direct Admin requires 4 fields. Though, seems like over-reach of token requirements, but the ones you need are: Account email, API key, API token with DNS, and API token with Zone.
- Log in to CloudFlare
- Go to Profile (click the user icon on top right corner)
- Go to API Tokens (Left)
- Retrieve the Global API Key and keep this for later. This step will require further verification.
- We’re now going to create a token that does both DNS and Zone.
- Click Create Token
- Create Custom Token
- Create Permissions like this:

Zone Settings: Read
Zone: Edit
DNS: Edit- For zones, you can do All Zones or specify which domains this applies to.
- For Client IP Address Filtering, add your server’s public IP address(es).
- Create the token and you’ll get a long token string.
Part 2: Configuration in Direct Admin
We will now setup auto SSL so that it updates CloudFlare accordingly to verify the DNS. We will be using the Evolution skin for this.
- Login as the user which has the relevant domain
- Go to SSL Certificates
- Select the domain on top right if you have more than one.
- Go to Get automatic certificate from ACME Provider tab
- Now you MUST select the wildcard checkmark. If you do not, the next options will not be visible.
- When checked a new row will appear with the option of DNS provider.
- Select CloudFlare (or any other third party DNS you’re using) and then a modal window will popup. This only appears now and will not be visible again, even if you come back to this screen later. For CloudFlare, it will look like so:
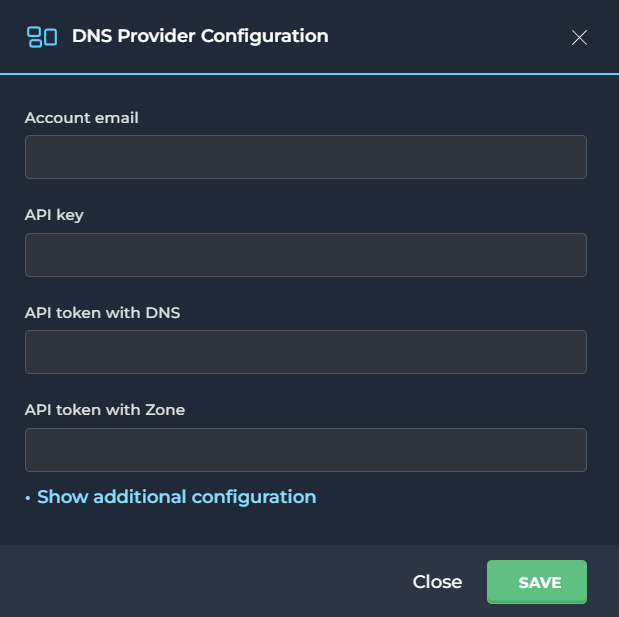
- Fill in the details with the information you got from Part 1. The token goes into both the DNS and Zone section.
- Hit Save on the popup window.
- Hit Save again for the auto SSL.
That’s it! Now you have automatic SSL with Let’s Encrypt/ZeroSSL for your domain and all your subdomains, allowing all services to connect securely while also using CloudFlare for serving the web.
Bonus Tidbit
If you’d like to automatically synchronize your DirectAdmin DNS and CloudFlare DNS, you can use a plugin called daflare.
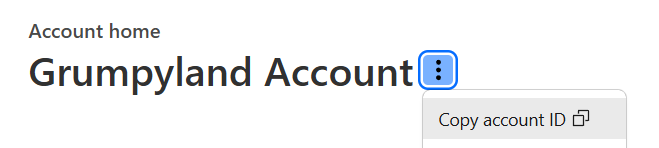
This will copy all of your DNS data from your DA to your CF. If you’ve followed this setup, you’ve already got almost all the credentials you need for daflare. Just need to grab the account ID from CF from Account home page.
Just be warned that this plugin saves DNS information in ONE direction. From DA to CF. So all information in CF that’s not in DA will be deleted.
Leave a Reply